


Being able to keep in touch with your site visitors is a great way to solidify relationships, answer questions and concerns, and directly interact with those that have shown an interest in what you have to offer.
However, WordPress does not have an out-of-box contact form for you to work with.
Luckily, like most things related to WordPress, there are tons of exceptional free and premium contact form plugins available for use.
However, for today’s purposes, I am going to show you step-by-step how to add a contact form to your WordPress website using a free and highly popular contact form by the name of WPForms Lite.
[clickToTweet tweet=”Use WPForms Lite and easily add a contact form to your WordPress website.” quote=”Use WPForms Lite and easily add a contact form to your WordPress website.”]
So, let’s get you set up so you can start communicating with your site visitors today.
How to Add a Contact Form Using WPForms Lite
WPForms Lite is a WordPress contact form plugin that makes adding a contact form (or any other type of form you can think of) to your WordPress site a cinch.
It features a drag & drop form builder complete with custom fields for personalizing your forms to meet your needs. In addition, it comes with pre-built templates to get you started, mobile-friendly design, SEO and speed optimization, and smart CAPTCHA for preventing spam forms from being submitted.
Plus, if you really like what you see in WPForms Lite, you can invest in their Pro version and receive features such as:
- Email service provider integration
- Acceptance of multiple file uploads including PDFs, Word Docs, images, and video
- Multi-page form capability
- Payment gateway integration
- Smart Conditional Logic for adaptable forms
- And more
Now, let’s get started with adding a contact form to your WordPress website.
Step 1: Installation and Activation
The first thing you will need to do is navigate to Plugins > Add New and search for WPForms.
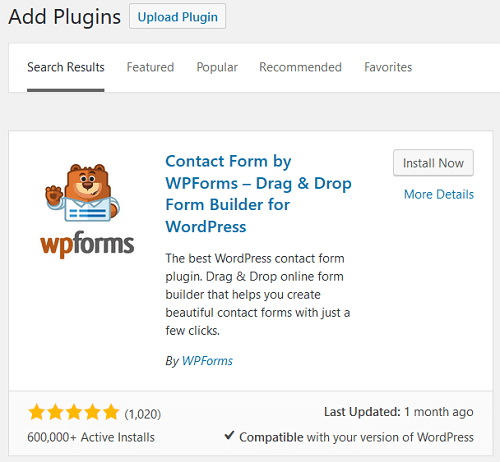
Next, click on Install Now and Activate.
Step 2: Choose a Template
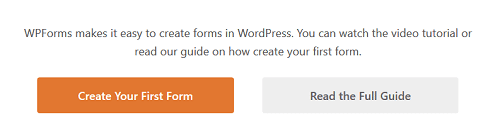
Upon activation of WPForms Lite, you will be prompted with the opportunity to Create Your First Form right away.
On the next screen, you will see several types of templates to choose from including Blank Form, Simple Contact Form, Newsletter Signup Form, and Suggestion Form. If you are using the Pro version, you will have access to many other pre-designed templates.
Here, you will also notice a section where you can name your form.
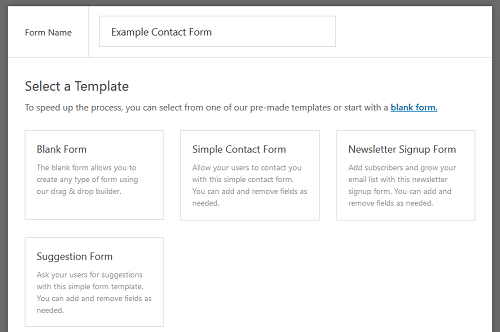
For example’s sake, I will select Simple Contact Form and name my form Example Contact Form.
Step 3: Build Your Form
The next screen presents you with WPForms Lite’s drag & drop form builder. It also displays your contact form template, complete with standard fields you would typically see on that particular type of template.
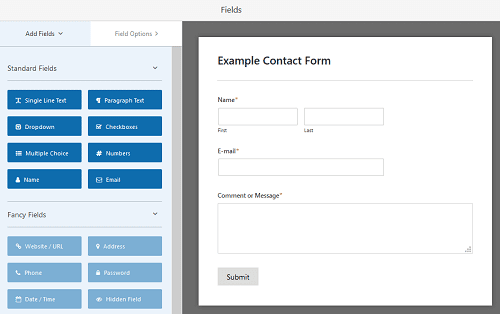
To add new fields to your contact form, simply click on the field from the option on the left and drag it over to the desired position on your working contact form.
Here, I dragged the Checkboxes field to the section below the E-mail section and customized the text. I made the selection of one box a requirement for form submission and made it clear what I need each site visitor seeking contact needs to do in order to response from me.
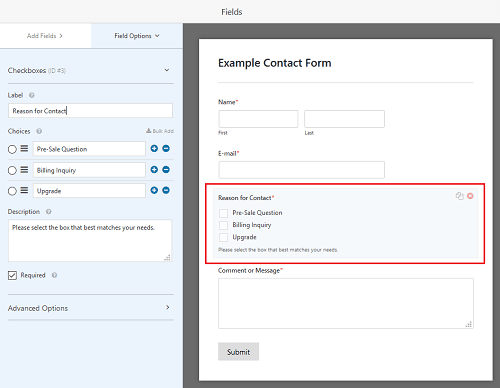
You can add unlimited fields to your contact form and customize them however you want. The great thing is, as you drag & drop fields to your form, you see in real time exactly how it will appear to your site visitors, which is a nice touch.
This saves you the hassle of having to “Preview” your form every time you make a change to make sure it looks like you want it to.
When you are done, make sure to save your changes.
Step 4: Configure Settings
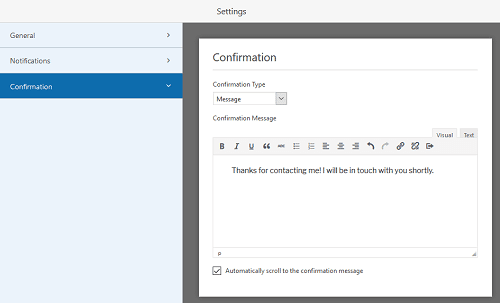
After you have customized your contact form, click on the Settings tab. Here you will do three things:
- General Settings. Change your form name if you want and provide a description as well. In addition, customize the submit button. You can also enable the anti-spam honeypot feature.
- Notifications. Enable/disable notifications that are sent by default to the Admin Email on your WordPress website. If you want inquiries sent to a specific email address, you can change that as well. You can also have notifications sent to multiple email addresses by simply separating them with commas.
- Confirmation. Customize what happens once a site visitor submits a contact form. For example, display a message, show a specific page, or redirect to a specific URL. In addition, customize the confirmation message your site visitors will see upon successful submission.
Step 5: Add Form to Your Website
Now that everything is customized and configured on your contact form, it is time to add it to your website.
To do this, first close out of the WPForms Lite screen. Then navigate to the post or page you want to display your contact form on. I will go to my Contact Page and make the required edits there.
When you get to the post or page you want to add a contact form to, you will notice a new Add Form button appearing in the WordPress Editor.

Click on this button and choose which contact form you want to include on the post or page you are editing.
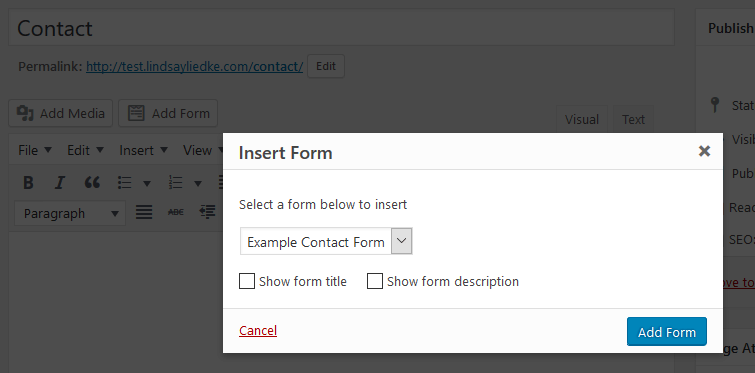
Once you select the contact form you want displayed, the shortcode will automatically add to your post or page.
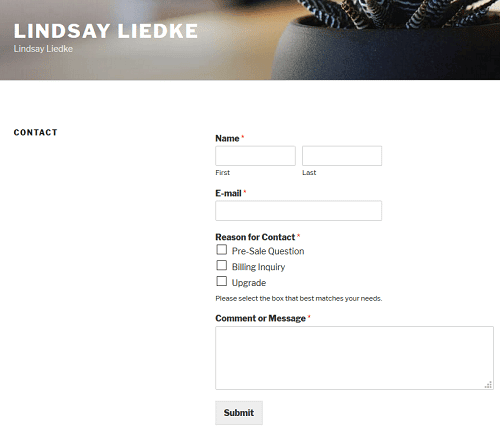
You can now view your post or page with the added contact form. Mine looks like this:
Final Thoughts
In the end, adding a contact form to your WordPress website is relatively simple. And, it is extremely helpful in forging stronger relationships with your site visitors, answering their questions and concerns, and helping to boost conversions, whether in the form of subscribers or customers.
If you are in the market for an easy to use, high-quality, and versatile contact form, check out WPForms. Chances are even the free version has exactly what you are looking for.

Does the contact form need to be on a https page?
If it’s not, users of Chrome and Firefox will see a ‘not secure’ message when typing in the form fields. But the same goes for any other form field (like comments) on your WordPress site.
Can’t get excited about using a form that requires an annual subscription. Just one more thing to go wrong. Instead, Contact Form 7. Also, the ability to upload an attachment is considered a premium feature. No thanks.
Hi Nowhere 2 Go,
Thanks for your input regarding the use of WPForms. I agree, Contact Form 7 is still one of the most popular contact forms available for use today. Unfortunately, however, the interface is not very user friendly, especially for new website owners not familiar with basic HTML. That’s one of the reasons I use WPForms. It has an incredibly easy to use drag & drop builder.
That said, I do agree it would be awesome if the ability to upload files was available in the free WPForms plugin. While I personally have no need for this feature on my own website, I understand this is important for many website owners.
Lastly, just to clarify…there is no need for an annual subscription if you use the free version of WPForms. There are lots of really great features out of the box that rival the older, though still popular Contact Form 7. In fact, I would argue that the pre-designed templates, form field options, and support options far surpass that of Contact Form 7.
Luckily however, we have many options for our websites! So, in the end, if Contact Form 7 is what works for you, then that’s great! And, I think it is fair for you to state you opinion.
Thanks for stopping by!
I have generally been avoiding WP like the plague for years, with just a tiny dabble here an there, but I feel I can’t avoid it any longer. And now I’m even warming up to it and almost wondering what I didn’t like so much. (On second thought, I’ll get to some of that.) That’s another reason why I have appreciated your posts.
I literally just got into this very thing just within days, and I too opted for WPForms for the time being because it was so much more user friendly than 7.
My only disappointment is not being able to add logic to the dropdown field in the free version. I want to make it impossible to proceed if the field value is not “Yes” vs. no or blank.
I suppose eventually I’ll check out 7, or go with a paid option for more features.
Thanks for putting this together, Lindsay.
Now regarding some unpleasantness:
You see in your final screenshot of the two column version where the word “Contact” is the heading on the left? How do you put things to appear under that? If it is possible, it should be a simple obvious user friendly thing. I mean I even worked in IT for a while before, but I could not see or find a simple obvious user friendly way to add things there so that the first column is not so bare with nothing but a heading.
Hi John,
You are not the only one that has made the cross over to using WordPress, of that I can assure you. That said, it is not perfect, and I would never claim it to be.
As far as WPForms and conditional logic – yes, that is a premium feature. If you choose to go with Contact Form 7, you can add conditional logic with this extension https://wordpress.org/plugins/cf7-conditional-fields/
Another great (and free!) contact form plugin, with conditional logic features, is Caldera Forms https://wordpress.org/plugins/caldera-forms/
As far as your last question is concerned…I too noticed this excessive white space and would not say I was entirely thrilled with it. For my test site and this post I was using the Twenty Seventeen theme. I also have no sidebars in place which is why I am pretty sure the whitespace is there. When I switched to the Twenty Fifteen theme, the layout was much better. My sidebars were there, the contact form appeared much larger, and there was no excessive whitespace.
In the end, how your contact form looks on your website is going to largely depend on the theme you have activated and the design features you have enabled.
I really hope this helps and you find the contact form for you. I know I struggled to find a good one for my website for awhile. Sometimes it just takes some good old trial and error 🙂
Thanks, Lindsay, this is extremely helpful. 🙂
Yes, I’ve been using 2017 too experiencing the exact same. I just got back here otherwise I would have replied sooner.
Which reminds me – I used to receive the emails for follow up replies, but they stopped coming around a year or two ago no matter how many times I click to subscribe. This is happening with this blog DNW, DI, TheDomains, etc. I logged into WordPress to see if I could do anything, but have never found a solution. Do you know how to get the emails to start being sent again when I subscribe to blog threads? Only a few have arrived all this time but there should be many many more.
P.S. And Andrew’s known about this too and he’s been no help! 🙁 🙁 😀